Piwigo, Your Private Google Photos Alternative


Looking for the best way to organise photos with privacy in mind? Try Piwigo, a self-hosted photo library for your home server. Manage and share your cloud photo storage from any location. Piwigo features nested albums, batch editing, multiple users, tags, plugins, themes, and more.
This chapter assumes you’ve already set up your home server with basic and advanced security measures, including secure remote access.
Looking for a Piwigo alternative?
Beyond Nextcloud, there are plenty of alternatives, choose a software which responds to your needs.
| Piwigo | Photoprism | Photoview | Pigallery2 | Lychee | |
|---|---|---|---|---|---|
| Creation date | 2002 | 2018 | 2020 | 2017 | 2018 |
| Language | PHP | Go | Go | TypeScript | PHP |
| Minimum requirements | Apache or nginx, PHP | 2 cores, 4 GB RAM | -- | -- | Apache or nginx |
| Database | MySQL, MariaDB | MySQL, MariaDB SQLite | MySQL, Postgres, SQLite | SQL or no database | MySQL, PostgreSQL or SQLite |
| Installation | Direct install | Docker | Docker, Direct install | Docker, Direct install | Docker, Direct install |
| User interface | Basic | Modern | Modern | Basic | Modern |
| Speed | Fast | Fast | Fast | Fast | Fast |
| Albums, nested albums | ✔ | ✔ | ✔ | ✔ | ✔ |
| Tags, labels | ✔ | ✔ | ✗ | ✔ | ✔ |
| Auto tags | ✗ | ✔ | ✗ | ✗ | ✗ |
| Face recognition | ✗ | ✗ | ✔ (automatic) | ✔ (manual) | ✗ |
| Bulk edit | ✔ | ✗ | ✗ | ✗ | ✔ |
| Duplicate detection | ✔ | ✔ | ✔ | ✔ | ? |
| Search | ✔ | ✔ | ✔ | ✔ | ✔ |
| Calendar/Timeline | ✔ | ✗ | ✔ | ✗ | ✗ |
| Places/Map | ✔ | ✔ | ✔ | ✔ | ✗ |
| Multi users | ✔ | ✗ | ✔ | ✔ | ✔ |
| Permissions | ✔ | ✗ | ✔ | ✔ | ✔ |
| Sharing | ✔ | ✔ | ✔ | ✔ | ✔ |
| Comments | ✔ | ✗ | ✗ | ✗ | ✗ |
| Delete | ✔ | ✗ | ✔ | ✗ | ✔ |
| RAW file support | ✗ | ✔ | ✔ | ✗ | ✗ |
| Video support | ✔ | ✔ | ✔ | ✔ | ✔ |
| Responsive web interface | ✔ | ✔ | ✔ | ✔ | ✔ |
| Native mobile apps | Android & iOS, no auto-upload | Android & iOS, experimental auto-upload | ✗ | ✗ | ✗ |
| Folder structure support1 | ✔ | ✔ (indexing) | ✔ | ✔ | ✗ |
| WebDAV, FTP support2 | ✔ | ✔ | ✔ | ? | ✗ |
- Software points to an existing folder structure containing photos/videos, without the need to alter or replicate them. No need for a separate copy of the files. The photos/videos remain untouched if the software is uninstalled.
- WebDAV / FTP clients can directly connect to folders containing photos/videos and mount them as a network drive. This way, photos/videos can be added, removed & modified on client devices.
Database
Piwigo is a photo management software which deploys with MySQL or MariaDB. This tutorial focuses on generating a MySQL database for Piwigo's server components.
Step-by-step guide
Log into the server and access MySQL as root:
sudo mysql -u root -p
Create the MySQL user piwigoadmin (adjust accordingly). Make sure to replace the string StrongPassword with a strong, unique password:
CREATE USER 'piwigoadmin'@localhost IDENTIFIED BY 'StrongPassword';
Next, generate the database required by Piwigo and grant correct permissions:
CREATE DATABASE piwigo;
GRANT ALL ON piwigo.* TO 'piwigoadmin'@'localhost';
FLUSH PRIVILEGES;
EXIT;
Log back into MySQL as the user piwigoadmin (adjust accordingly):
sudo mysql -u piwigoadmin -p
Make sure the piwigo database has been created correctly:
SHOW DATABASES;
The output should look similar to this:
+--------------------+
| Database           |
+--------------------+
| information_schema |
| piwigo             |
+--------------------+
2 rows in set (0.01 sec)
Exit MySQL:
EXIT;

Installation
Resolve all dependencies and install Piwigo on your server.
Step-by-step guide
Prerequisites
Piwigo requires PHP to run. Check which version is installed on your system:
php -v
One of the previous chapters on server hardening covered how to deploy and secure PHP 8.3 which, at the time of writing, is included by default in Ubuntu's 24.04 repositories. This should already cover Piwigo's main software dependencies, such as php8.3-{common,mysql,curl,xmlrpc,gd,mbstring,xml,intl,cli,zip}.
Install some additional PHP modules:
sudo apt install php8.3-{cgi,soap,ldap,readline,imap,tidy}
sudo apt install libapache2-mod-php8.3
Installation
Check the latest release of Piwigo's self-hosted package. At the time of writing, it was 15.5.0. Download and decompress the package with the following commands:
wget http://piwigo.org/download/dlcounter.php?code=latest -O /tmp/piwigo.zip
sudo unzip /tmp/piwigo.zip 'piwigo/*' -d /var/www
Set and verify the right permissions:
sudo chown -R www-data:www-data /var/www/piwigo/
sudo chmod -R 755 /var/www/piwigo/
sudo ls -al /var/www/
Web interface
Set up an Apache Virtual Host as a Reverse Proxy to access the Piwigo web interface via a custom address and shield the server from direct internet exposure. Read on below for more details.
Step-by-step guide
Create an Apache configuration file:
sudo vi /etc/apache2/sites-available/myphotos.gofoss.duckdns.org.conf
Add the following content and make sure to adjust the settings to your own setup, such as domain names (myphotos.gofoss.duckdns.org), path to SSL keys, IP addresses and so on:
<VirtualHost *:80>

ServerName              myphotos.gofoss.duckdns.org
ServerAlias             www.myphotos.gofoss.duckdns.org
Redirect permanent /    https://myphotos.gofoss.duckdns.org/

</VirtualHost>

<VirtualHost *:443>

ServerName              myphotos.gofoss.duckdns.org
ServerAlias             www.myphotos.gofoss.duckdns.org
ServerSignature         Off

<IfModule security2_module>
    SecRuleEngine Off
</IfModule>

SSLEngine               On
SSLProxyEngine          On
SSLProxyCheckPeerCN     Off
SSLCertificateFile      /etc/dehydrated/certs/gofoss.duckdns.org/fullchain.pem
SSLCertificateKeyFile   /etc/dehydrated/certs/gofoss.duckdns.org/privkey.pem
DocumentRoot            /var/www/piwigo

<Location />
    Order deny,allow
    Deny from all
    Allow from 127.0.0.1
    Allow from 192.168.1.0/24
    Allow from 10.8.0.1/24
</Location>

<Directory /var/www/piwigo/>
    Options +FollowSymlinks
    AllowOverride All
    Require all granted
</Directory>

ErrorLog ${APACHE_LOG_DIR}/myphotos.gofoss.duckdns.org-error.log
CustomLog ${APACHE_LOG_DIR}/myphotos.gofoss.duckdns.org-access.log combined

</VirtualHost>
Once the content is added, save and close the file (:wq!).
Note how we enable SSL encryption for Piwigo with the instruction SSLEngine On, and use the SSL certicate /etc/dehydrated/certs/gofoss.duckdns.org/fullchain.pem as well as the private SSL key /etc/dehydrated/certs/gofoss.duckdns.org/privkey.pem, which were created earlier on.
Also note how we disabled ModSecurity in the Apache configuration file with the instruction SecRuleEngine Off, as Piwigo and ModSecurity don't play well together.
Next, enable the Apache Virtual Host and restart Apache:
sudo a2ensite myphotos.gofoss.duckdns.org.conf
sudo systemctl reload apache2
Configure Pi-Hole to resolve Piwigo's local address. Browse to https://mypihole.gofoss.duckdns.org:8443/admin (adjust accordingly) and log into Pi-Hole's web interface. Navigate to the menu entry Local DNS Records and add the following domain/IP combination (adjust accordingly):
DOMAIN:      myphotos.gofoss.duckdns.org
IP ADDRESS:  192.168.1.100
Configuration
You’ve successfully installed Piwigo! Now, configure the maximum upload size, the gallery title, user registration, and more.
Step-by-step guide
Maximum photo size
On the server, open the Apache PHP configuration file:
sudo vi /etc/php/8.3/apache2/php.ini
Modify or add the following parameters to increase the maximum upload file size to 20 MB:
upload_max_filesize = 20M
post_max_size = 20M
Open the command line interface (CLI) PHP configuration file:
sudo vi /etc/php/8.3/cli/php.ini
Modify or add the following parameters to increase the maximum upload file size to 20 MB:
upload_max_filesize = 20M
post_max_size = 20M
Wrap up
Browse to https://myphotos.gofoss.duckdns.org (adjust accordingly) and follow the configuration guide:
| Field | Description |
|---|---|
| Host | The default value is localhost. |
| User | Provide the name of the MySQL user. In our example, that's piwigoadmin, adjust accordingly. |
| Password | Provide the password of the MySQL user. |
| Database name | Provide the name of the MySQL database. In our example, that's piwigo, adjust accordingly. |
| Database tables prefix | The default value is the name of the MySQL database followed by an underscore. In our example, that's piwigo_, adjust accordingly. |
| Webmaster username | Create a webmaster account for Piwigo. For the purpose of this tutorial, we'll call the webmaster piwigoadmin@gofoss.net, adjust accordingly. |
| Webmaster password | Provide a strong, unique password for the webmaster account. |
| Webmaster email | Provide an email address for the webmaster account. |
Once the configuration is finished, click on the buttons Start installation, Visit the gallery and I want to add photos. That's it, Piwigo is ready for use!
Start adjusting some basic settings in Configuration ‣ Options ‣ General:
- change the gallery title and banner
- disable user registration (uncheck
Allow user registration) - track who logs into Piwigo (select
Save visits in historyfor visitors, registered users and/or administrators)
Users
Piwigo distinguishes between three user types. Webmasters and Administrators enjoy complete Piwigo access to manage photos, albums, users, groups, etc. Additionally, webmasters can install plugins and themes, maintain and update the website, and more. Finally, Users have restricted Piwigo access and can view albums or photos based on their permissions.
Step-by-step guide
| Instructions | Description |
|---|---|
| Step 1 | Browse to https://myphotos.gofoss.duckdns.org and log in as webmaster piwigoadmin@gofoss.net (adjust accordingly). |
| Step 2 | Navigate to Users ‣ Manage ‣ Add a user. |
| Step 3 | Provide a user name, as well as a strong, unique password. Then click on Add user. |
| Step 4 | Provide the status of the new user, for example user or administrator. |
How to share pictures (VPN access required)
All admins and users must be connected to the home photo server via VPN to access Piwigo.
Add photos
Use your browser to add a moderate number of pictures or single albums. Files upload to the server directory /var/www/piwigo/upload. Keep in mind: photo addition, editing, and removal are exclusive to administrators.
Step-by-step guide
| Instructions | Description |
|---|---|
| Log in | Log into Piwigo's web interface with an administrator account. |
| Web form | Navigate to Admin ‣ Photos ‣ Add ‣ Web Form. 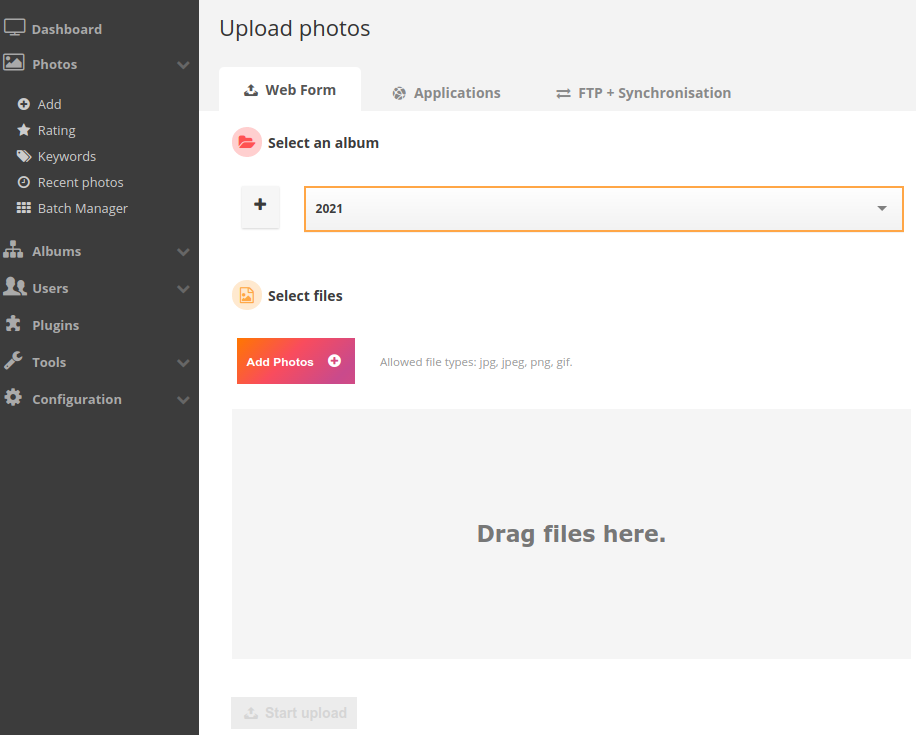 |
| Album | Create a new album, or select an existing one. |
| Add photos | Add photos by clicking on the Add Photos button, or dragging and dropping them into the dedicated area. |
| Upload | Click on Start upload. |
Use an FTP client like FileZilla to add large amounts of files or uploading entire folder structures. Files upload to the server directory /var/www/piwigo/galleries, preserving the original folder structure. Keep in mind: photo addition, editing, and removal are exclusive to administrators.
Step-by-step guide
| Instructions | Description |
|---|---|
| Login | On your Ubuntu/Linux computer, log in with the gofossadmin account (adjust accordingly). This is the account with remote SSH access to the server, as configured in the chapters Ubuntu Server and Basic server hardening. |
| Preparation | Still on your Ubuntu/Linux computer, sort the photos in a folder structure of your choice. Each folder will become an album in Piwigo. The depth of the nested folder tree is unlimited. Make however sure to respect naming conventions: folders and files can only contain letters, numbers, dashes, underscores or dots. No blank spaces or special characters are allowed. |
| FTP installation | If not already installed, open a terminal with the CTRL + ALT + T shortcut and run the command sudo apt install filezilla. |
| FTP preparation | Open FileZilla and provide the correct credentials:  • Host: sftp://192.168.1.100 (the server's IP address, adjust accordingly) • Username: gofossadmin (adjust accordingly) • Password: passphrase_used_to_ssh_into_the_server • Port: 2222 (SSH port configured in chapter Basic server hardening, adjust accordingly) |
| FTP connection | Still in FileZilla, click on Quickconnect. You will be prompted once again for the SSH passphrase. |
| File copy | FileZilla should display your local computer's file system in left pane, and the server's file system in the right one. Copy the folders with your pictures to the following directory on the server: /var/www/piwigo/galleries. |
| Login | Log into Piwigo's web interface with an administrator account. |
| Simulation | Navigate to Admin ‣ Tools ‣ Synchronise. Before synchronising anything, select the following settings (adapt the permissions Who can see these photos? to your needs):  Then click on Submit. Piwigo should display the number of new albums and photos which will be added or removed from the database, and if any errors are to be expected. Proceed if everything is OK. |
| Synchronisation | Still in Admin ‣ Tools ‣ Synchronise, uncheck perform a simulation only: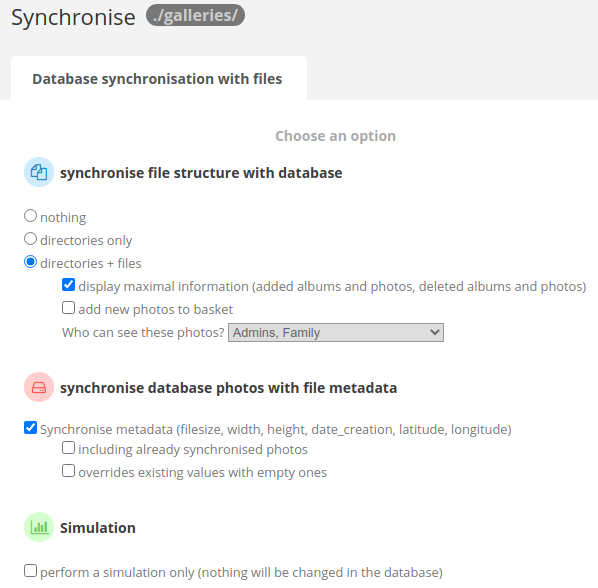 Then click on Submit. This may take a while, depending on the amount of data. Grab a cup of coffee! |
Some words of advice
Be aware that directories and files shouldn't be moved once they're uploaded to the server. Else, all associated data will be lost during the next synchronisation (such as comments, ratings and so on).
Use third-party photo applications like digiKam, Shotwell, Lightroom, or Piwigo's Android and iOS apps. It's ideal for uploading large quantities of unstructured photos to the server directory /var/www/piwigo/upload. Keep in mind: photo addition, editing, and removal are exclusive to administrators.
Step-by-step guide
Refer to the respective third party application documentation for instructions on the best way to organize photos. Most third party applications require credentials to connect to the server and add photos:
| Settings | Description |
|---|---|
| Server | Provide the address of the photo gallery. In our example, that's https://myphotos.gofoss.duckdns.org, adjust accordingly. |
| User | Provide the name of a Piwigo administrator or user. |
| Password | Provide the password of the Piwigo administrator or user above. |
Edit photos
Edit individual photos: alter title, author, creation date, album(s), keywords, description, privacy, geolocation, the photo's most significant area, etc.
Step-by-step guide
Log in as administrator and browse to Photos ‣ Batch Manager ‣ Global Mode. Apply one or several filters to find the photo you want to edit (more about filter attributes below). Hover over the photo and click on Edit. You are now able to modify the photo.
Batch editing, also known as bulk editing, allows you to edit multiple photos simultaneously.
Step-by-step guide
Log in as administrator and browse to Photos ‣ Batch Manager ‣ Global Mode. Apply one or several filters to find the photos you want to edit (more about filter attributes below). You can select or de-select all photos at once by clicking on All or None. Finally, specify what action to perform: delete, associate to one or several album(s), move to an album or dissociate from an album, set keywords, author, title, creation date or geotags and so on.
Tell me more about filter attributes
| Filter attributes | Description |
|---|---|
| Predefined filters | Filter all photos, all videos, duplicated photos, latest imported photos, geotagged photos, photos without an attributed album (orphans), photos without keywords, favourite photos, and so on. |
| Album | Filter photos from a specific album. |
| Keywords | Filter photos based on keywords. |
| Privacy level | Filter photos visible by everybody, contacts, friends, family or administrators. |
| Dimensions | Filter photos based on their size. |
| File size | Filter photos based on their file size. |
| Search | Filter photos based on advanced search results. Can be the title, tag, file name, author, creation date, post date, width, height, file size, ratio, and so on. |
Manage albums
Add new albums or modify existing ones via Piwigo’s web interface. Edit album details such as name and description, establish parent-child relationships, lock albums for administrator visibility only, upload photos, manage sub-albums, and arrange them automatically or manually. Other options include making albums public for anyone with a link or private for logged-in users with specific permissions.
Step-by-step guide
Log in as administrator and browse to Admin ‣ Album ‣ Manage ‣ List. To create a new album, click on Add album. To edit existing an album, hover the mouse over it and click on Edit. You are now able to modify the album's properties, sort order or permissions.
Manage permissions
Piwigo features two independent yet combinable access permission systems: manage access on an album basis with user/group permissions; and on a photo basis through privacy levels. This sophisticated permission system offers precise control over access rights for multiple users. If you don't share pictures, keep it simple: set all your albums to private and restrict access to yourself.
Albums are by default public and open to all users. Administrators can make albums private, restricting access to specific users and/or groups.
Step-by-step guide
To make an album private:
| Instructions | Description |
|---|---|
| Step 1 | Log in as administrator. |
| Step 2 | Browse to Album ‣ Manage ‣ List ‣ Edit ‣ Permissions. |
| Step 3 | Switch access from public to private. |
To limit access to private albums to certain users:
| Instructions | Description |
|---|---|
| Step 1 | Log in as administrator. |
| Step 2 | Either browse to Album ‣ Manage ‣ List ‣ Edit ‣ Permissions and add users which can view the private album to the box Permissions granted.Or browse to Users ‣ Manage ‣ Edit User ‣ Permissions and define which private albums the user can see (Authorised) or not (Forbidden). |
Access rights can also be defined for a set of users, called groups. This allows to set permissions for entire groups, which facilitates permission management if there are many users. To limit access to private albums to certain groups:
| Instructions | Description |
|---|---|
| Step 1 | Create groups by browsing to Users ‣ Groups ‣ Add Group. |
| Step 2 | Add users to a group by browsing to Users ‣ Manage ‣ Edit User ‣ Groups. |
| Step 3 | Finally, define album access rights for entire groups by browsing to Users ‣ Groups ‣ Permissions. |
Privacy levels operate on a per-photo and per-user basis, enabling precise access control.
Step-by-step guide
Piwigo manages permissions with five privacy levels. Here is how it works:
- each photo has a privacy level
- each user has a privacy level
- a user must have a privacy level greater or equal to the one of the photos he wants to view. Or put differently, the higher a users privacy level, the more photos he can see
The privacy level of photos can be specified by logging in as administrator and browsing to Photos ‣ Batch Manager ‣ Global Mode. Apply filters as needed, and select the relevant photos. Choose the action Who can see these photos and define the appropriate privacy level:
| Privacy level | Description |
|---|---|
| 1 | Everybody |
| 2 | Admins, Family, Friends, Contacts |
| 3 | Admins, Family, Friends |
| 4 | Admins, Family |
| 5 | Admins |
The privacy level of a user is defined by logging in as administrator and browsing to Users ‣ Manage ‣ Edit User ‣ Privacy level:
| Privacy level | Description |
|---|---|
| 1 | None |
| 2 | Contacts |
| 3 | Friends |
| 4 | Family |
| 5 | Admins |
Here a practical example, note that there are alternative ways to achieve the same result. Piwigo offers flexibility, allowing you to choose your preferred approach.
Show me the example
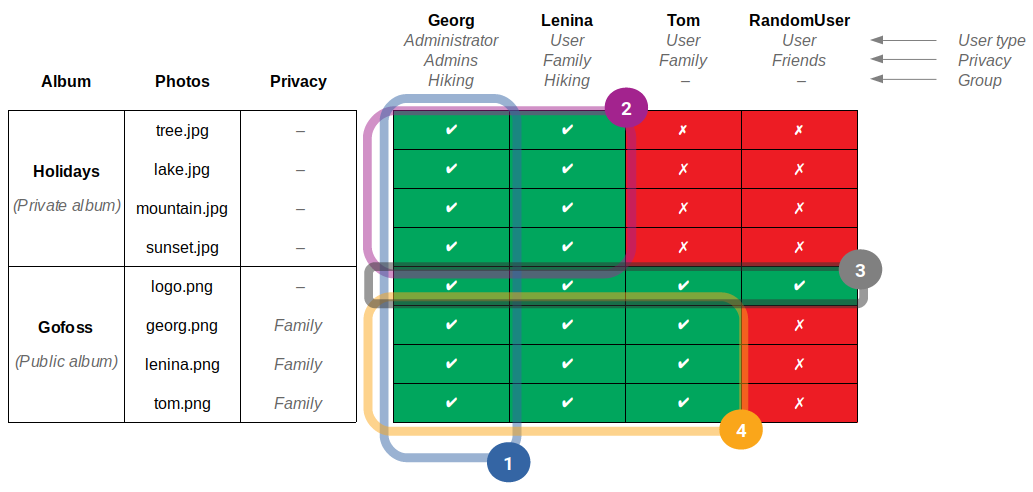
| Circle | Description |
|---|---|
| 1 | Georg serves as Administrator, enabling him to manage photos, albums, users, and groups. His privacy level, set to Admins, grants access to all albums and photos. |
| 2 | Georg uploads his recent hiking trip photos – tree.png, lake.png, mountain.png, and sunset.png – to the Holidays album. He want to share them exclusively with Lenina. Being a User, Lenina can only view public albums or files with proper permissions. Georg makes the Holidays album private, limiting access to the Hiking group, consisting only of himself and Lenina. |
| 3 | Georg uploads four pictures to the public album Gofoss: logo.png, georg.png, lenina.png, and tom.png. All users can access these pictures. |
| 4 | By setting the pictures georg.png, lenina.png, and tom.png to the Family privacy level, Georg restricts access to users with Family and higher privacy levels (such as Admins). In this instance, only Georg (Admins), Lenina (Family), and Tom (Family) have access. RandomUser, with a Friends privacy level, is denied access to these pictures. |
Plugins & themes
Extend Piwigo's capabilities with over 350 plugins!
Step-by-step guide
| Instructions | Description |
|---|---|
| Display plugins | To display all installed plugins, log in as webmaster piwigoadmin@gofoss.net (adjust accordingly) and browse to Admin ‣ Plugins ‣ Plugins List: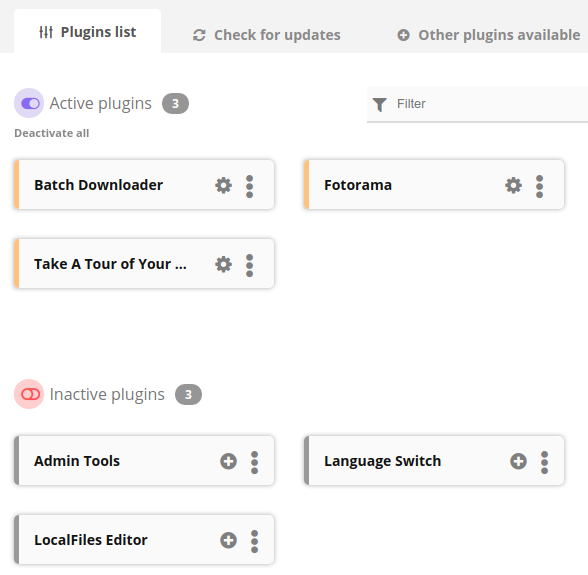 • Active plugins are installed and currently running • Inactive plugins are installed but currently disabled • Note that deactivating a plugin will keep most of its configuration saved, while deleting a plugin will remove any trace (files, configurations, etc.) |
| Update plugins | Browse to Admin ‣ Plugins ‣ Check for updates. |
| Add plugins | Browse to Admin ‣ Plugins ‣ Other plugins available. Search for a plugin and click on Install. Browse to Admin ‣ Plugins ‣ Plugins list and activate the installed plugin. |
Some popular plugins:
| Plugin | Description |
|---|---|
| Piwigo-Videojs | Piwigo video plugin, supports various formats: mp4, m4v, ogg, ogv, webm, webmv, etc. More info available on the Wiki page. |
| Fotorama | Full screen slideshow. |
| Batch downloader | Photo gallery download as zip file. |
| Piwigo-Openstreetmap | Geolocate your pictures. More info available on the Wiki page. |
| Grum Plugin Classes | Required to run some other plugins. |
| AStat | Extends the statistics generated by Piwigo, e.g. which pages or photos have been visited, for how long, from which IP address, etc. |
| EXIF view | Add EXIF metadata to your photos. |
Customise Piwigo's layout with over 140 themes!
Step-by-step guide
Log in as webmaster piwigoadmin@gofoss.net (adjust accordingly) and browse to Admin ‣ Configuration ‣ Themes. Download, activate or configure themes of your choice. Some popular ones:
| Themes | Description |
|---|---|
| Modus | Default theme, comes with several skins. |
| Bootstrap Darkroom | Another modern, feature-rich and mobile-friendly theme. |
| SimpleNG | Based on Bootstrap, responsive theme. |
Upgrade
Upgrading Piwigo is pretty straight forward. Just follow the instructions oulined below.
Step-by-step guide
Back up your photos in case anything goes wrong during the update. One possible way is to connect via FTP (FileZilla) as described previously and backup the folders /var/www/galleries and /var/www/upload.
You can also backup Piwigo's database using MySQL dump or server backups. Piwigo's MySQL database is usually stored in /var/lib/mysql.
Now, log in as webmaster piwigoadmin@gofoss.net (adjust accordingly) and browse to Admin ‣ Tools ‣ Updates ‣ Piwigo Update. Click on `Update to Piwigo xx.x.x`` and confirm.
Show me the 30-second summary video
Support
For further details, refer to Piwigo's documentation or forum.