Securely Access Your Server From Anywhere


You've set up your Ubuntu server and configured both basic and advanced security measures. Now, learn how to direct a (sub-)domain to your home IP address using DuckDNS. Encrypt trafic with Let’s Encrypt. Explore Pi-hole to block ads, manage server access, and set up privacy-centric DNS providers. And safely connect to your server from anywhere with OpenVPN.
Set up a DuckDNS domain
Human-readable addresses are easier to remember than random IP addresses. Users prefer gofoss.net to 18.192.76.182. To achieve this for your server, you need a domain name linked to your home IP address.
Step-by-step guide
DuckDNS offers free domain registration. Simply register a preferred domain on DuckDNS to obtain a unique token.
In this tutorial, we've registered gofoss.duckdns.org and received the token ebaa3bd3-177c-4230-8d91-a7a946b5a51e. This will allow us later on to access to services via addresses like https://myservice.gofoss.duckdns.org.
Next, you need to dynamically link the domain to your home IP. This way, DuckDNS ensures connectivity, even if your home IP changes. Log into your server and make following script:
mkdir duckdns
cd duckdns
vi duck.sh
Add the following text. Make sure to adjust your domain and token!
echo url="https://www.duckdns.org/update?domains=gofoss&token=ebaa3bd3-177c-4230-8d91-a7a946b5a51e&ip=" | curl -k -o ~/duckdns/duck.log -K -
Save and close the file (:wq!), then make it executable:
chmod 700 duck.sh
Create a cron job to run the script every 5 minutes:
sudo apt install cron
crontab -e
Paste the following at the bottom of the crontab:
*/5 * * * * ~/duckdns/duck.sh >/dev/null 2>&1
Save and close the file (:wq!), then test the script:
./duck.sh
Check if the script returned OK:
cat duck.log
If it returns KO, check your token and domain are correct in the duck.sh script.

Secure traffic with LetsEncrypt
All traffic should be encrypted over HTTPS. Your browser's address bar must consistently show a secure connection. To achieve this, obtain free SSL certificates from Let's Encrypt, a trusted Certificate Authority.
Step-by-step guide
Perform a LetsEncrypt DNS challenge with Dehydrated
Let's Encrypt needs to verify that you actually own the domain before delivering any certificate. A nifty program called Dehydrated makes this possible. Log into the server and download Dehydrated:
sudo apt install git
git clone https://github.com/dehydrated-io/dehydrated.git
Navigate to the directory dehydrated and create a first configuration file:
cd dehydrated
vi domains.txt
Add the following line, and make sure to provide your own domain name:
*.gofoss.duckdns.org > gofoss.duckdns.org
Save and close the file (:wq!), then create a second configuration file:
vi config
Add the following lines. Make sure to provide your own email address:
CHALLENGETYPE="dns-01"
BASEDIR=/etc/dehydrated
HOOK="${BASEDIR}/hook.sh"
CONTACT_EMAIL=gofoss@gofoss.net
Save and close the file (:wq!), then create a third configuration file:
vi hook.sh
Add the following lines. Make sure to provide your own domain name, as well as your own token delivered by DuckDNS:
DOMAIN="gofoss.duckdns.org"                         # provide your domain here
TOKEN="ebaa3bd3-177c-4230-8d91-a7a946b5a51e"        # provide your token here

case "$1" in
    "deploy_challenge")
        curl "https://www.duckdns.org/update?domains=$DOMAIN&token=$TOKEN&txt=$4"
        echo
        ;;
    "clean_challenge")
        curl "https://www.duckdns.org/update?domains=$DOMAIN&token=$TOKEN&txt=removed&clear=true"
        echo
        ;;
    "deploy_cert")
        ;;
    "unchanged_cert")
        ;;
    "startup_hook")
        ;;
    "exit_hook")
        ;;
    *)
        echo Unknown hook "${1}"
        exit 0
        ;;
esac
Save and close the file (:wq!).
Caution: Above instructions need to be modified if you work with another domain than DuckDNS. Please refer to Dehydrated's documentation or Let's Encrypt's community to properly set up the hook for DNS-based validation.
The next set of commands creates a directory where all SSL certificates will be stored, called certs. The files dehydrated and hook.sh are made executable. The dehydrated directory moves to /etc/dehydrated. Finally, gofossadmin is given the ownership of the directory /etc/dehydrated. Make sure to adjust the administrator name to your own setup:
mkdir certs
chmod a+x dehydrated
chmod a+x hook.sh
cd ..
sudo mv dehydrated /etc/dehydrated
sudo chown -R gofossadmin:gofossadmin /etc/dehydrated
Check the directory layout:
sudo ls -al /etc/dehydrated
The output should look something like:
drwxr-xr-x 2 gofossadmin gofossadmin   4096 Jan 01 00:00 .
drwxr-xr-x 4 gofossadmin gofossadmin   4096 Jan 01 00:00 ..
-rw-r--r-- 1 gofossadmin gofossadmin    200 Jan 01 00:00 certs
-rw-r--r-- 1 gofossadmin gofossadmin    200 Jan 01 00:00 config
-rwxr-xr-x 1 gofossadmin gofossadmin 700000 Jan 01 00:00 dehydrated
-rw-r--r-- 1 gofossadmin gofossadmin    200 Jan 01 00:00 docs
-rw-r--r-- 1 gofossadmin gofossadmin     20 Jan 01 00:00 domains.txt
-rwxr-xr-x 1 gofossadmin gofossadmin    700 Jan 01 00:00 hook.sh
Create a LetsEncrypt wildcard certificate
Register with Let's Encrypt:
bash /etc/dehydrated/dehydrated --register --accept-terms
This command creates a directory /etc/dehydrated/accounts, containing your registration information. The terminal should show something like:
# INFO: Using main config file /etc/dehydrated/config
+ Generating account key...
+ Registering account key with ACME server...
+ Done!
Now, create the SSL certificate:
bash /etc/dehydrated/dehydrated -c
The terminal should prompt something like:
+ Creating chain cache directory /etc/dehydrated/chains
Processing gofoss.duckdns.org
+ Creating new directory /etc/dehydrated/certs/gofoss.duckdns.org ...
+ Signing domains...
+ Generating private key...
+ Generating signing request...
+ Requesting new certificate order from CA...
+ Received 1 authorizations URLs from the CA
+ Handling authorization for gofoss.duckdns.org
+ 1 pending challenge(s)
+ Deploying challenge tokens...
OK
+ Responding to challenge for gofoss.duckdns.org authorization...
+ Challenge is valid!
+ Cleaning challenge tokens...
OK
+ Requesting certificate...
+ Checking certificate...
+ Done!
+ Creating fullchain.pem...
+ Done!
That's it! Two SSL keys have been created to encrypt all traffic to and from your self-hosted services. We'll explain later how to use these keys.
| File | Location |
|---|---|
| Public key | /etc/dehydrated/certs/gofoss.duckdns.org/fullchain.pem |
| Private key | /etc/dehydrated/certs/gofoss.duckdns.org/privkey.pem |
LetsEncrypt renew certificate
Let's Encrypt's certificates expire after 90 days, and can be renewed 30 days before expiry. It's a good idea to automate these updates. Create a log file:
sudo touch /var/log/dehydrated
Next, create a weekly cron job which checks the certificate's validity and, if required, renews it:
sudo vi /etc/cron.weekly/dehydrated
Add the following content:
#!/bin/sh

MYLOG=/var/log/dehydrated
echo "Checking cert renewals at `date`" >> $MYLOG
/etc/dehydrated/dehydrated -c >> $MYLOG 2>&1
Save and close the file (:wq!). Now, make the script executable:
sudo chmod +x /etc/cron.weekly/dehydrated
Test the cronjob:
sudo bash /etc/cron.weekly/dehydrated
sudo cat /var/log/dehydrated
The terminal output should look something like:
Checking cert renewals at Sun 01 Jan 2021 01:29:06 PM CEST
# INFO: Using main config file /etc/dehydrated/config
Processing *.gofoss.duckdns.org
 + Checking domain name(s) of existing cert... unchanged.
 + Checking expire date of existing cert...
 + Valid till Mar 12 10:23:18 2021 GMT (Longer than 30 days). Skipping renew!
What about self-signed certificates?
Self-signed certificates offer HTTPS encryption but may not be recognised by certain browsers or applications. It's advisable to favour Certificate Authorities like Let's Encrypt for broader recognition and trust.
Block ads with PiHole
Pi-hole is a nifty tool, capable of resolving local addresses, choosing a DNS provider, and blocking ads as well as trackers. Set up Pi-hole on your server by following the instructions below.
Step-by-step guide
Install PiHole
It's quite lightweight, 50 MB of free space and 512 MB of RAM are enough to run it on Ubuntu. Pi-hole also requires a static IP address, which we configured in previous chapters. Run Pi-hole's install script:
sudo curl -sSL https://install.pi-hole.net | bash
Follow the on-screen instructions:
| Instruction | Description |
|---|---|
| This installer will transform your device into a network-wide ad blocker! | Hit ENTER to continue. |
| The Pi-hole is free, but powered by your donations | Hit ENTER to continue. |
| The Pi-hole is a SERVER so it needs a STATIC IP ADDRESS to function properly | Select Yes, then hit ENTER to continue. |
| Select Upstream DNS Provider. To use your own, select Custom | Select a DNS provider of your choice. In this example, we'll use UncensoredDNS, but feel free to select any other DNS provider! We suggest to choose a DNS provider other than your ISP, Cloudfare or Google. Learn more about DNS providers at the end of this section. |
| Pi-hole relies on third party lists in order to block ads. | Hit ENTER to continue. We'll explain later how to add more block lists. |
| Do you want to log queries? | Select On (recommended) and hit ENTER to continue. |
| Select a privacy mode for FTL | Select the privacy level of your choice, and hit ENTER to continue: • Show everything: records everything; provides the maximum amount of statistics. • Hide domains: displays and stores all domains as "hidden"; disables the Top Domains and Top Ads tables on the dashboard. • Hide domains and clients: displays and stores all domains as "hidden" and all clients as "0.0.0.0"; disables all tables on the dashboard. • Anonymous mode: disables basically everything except the live anonymous statistics; no history is saved to the database, nothing is shown in the query log, there are no top item lists; provides enhanced privacy. |
| Installation Complete! | Once the installation completes, you should see this: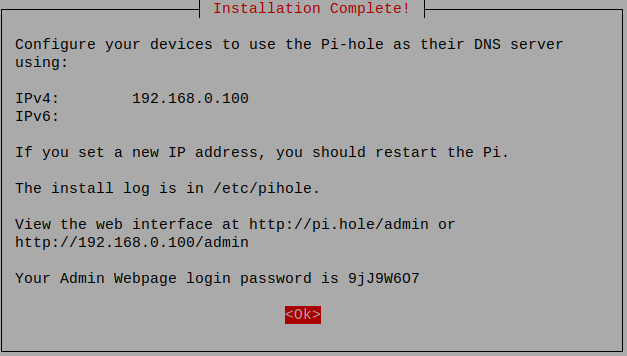 |
Pi-hole/admin web interface
Change Pi-hole's webserver ports to avoid that it listens on the same ports as Apache:
sudo pihole-FTL --config webserver.port '8080o,8443os,[::]:8080o,[::]:8443os'
sudo systemctl restart pihole-FTL
Open these ports in the firewall:
sudo ufw allow 8080,8443/tcp
sudo ufw allow out 8080,8443/tcp
Use the previously created private SSL key and SSL certicate to encrypt traffic:
sudo cat /etc/dehydrated/certs/gofoss.duckdns.org/privkey.pem /etc/dehydrated/certs/gofoss.duckdns.org/fullchain.pem > combined.pem
sudo mv combined.pem /etc/pihole
sudo pihole-FTL --config webserver.tls.cert '/etc/pihole/combined.pem'
Set the right permissions:
sudo usermod -aG pihole www-data
sudo chown -R pihole:pihole /etc/pihole
sudo chown pihole:pihole -R /var/www/html/admin/
Restart Pi-hole and check if everything runs correctly. The output should display "Active":
sudo systemctl restart pihole-FTL
sudo systemctl status pihole-FTL
Change the default password for Pi-hole's web interface. Provide a strong, unique password:
sudo pihole setpassword
Browse to https://192.168.1.100:8443/admin/ and login with the new credentials. Make sure to adjust the server's IP address to your own setup. The web interface should show on the screen – ignore security warnings about the Letsencrypt certificate. The various settings are described on Pi-hole's website:
| Feature | Description |
|---|---|
| Gravity | Browse to Tools ‣ Update Gravity to fetch the latest block lists. Be patient, it can take some seconds. |
| Dashboard | Displays statistics: how many domains have been visited or blocked, how many domains are on the blocklist, and so on. |
| Queries | Detailed information on queries. |
| Blocklists | Navigate to Group management ‣ Lists to add more blocklists and filter additional ads and malware. You'll find more information about Pi-hole Blocklists at the end of this section. |
| Settings | Easily manage and configure Pi-hole: DNS servers, privacy, etc. |
| Local DNS | Pi-hole is capable of resolving local addresses. Navigate to System ‣ Settings ‣ Local DNS Records and add the following domain/IP combination (adjust according to your own setup): Domain: mypihole.gofoss.duckdns.org IP Address: 192.168.1.100 |
From now on, you can securely access Pi-hole by browsing to https://mypihole.gofoss.duckdns.org:8443/admin/.
What is private DNS?

The Domain Name System (DNS) translates website addresses into computer-friendly IP addresses. Each time you visit a website, a DNS resolver finds its IP address and connects you to the appropriate server.
Despite their importance, DNS queries pose privacy risks by logging every site you visit. Your DNS resolver, be it Google, Cloudflare, or your ISP, sees and stores your browsing history. Internet providers can also exploit DNS queries to censor your online activities. Finally, most DNS queries are unencrypted, leaving them vulnerable to eavesdropping and spoofing attacks.
Pi-hole let’s you choose a trusted DNS resolver for browsing the Web. Consider privacy-aware DNS providers such as:
| DNS provider | Country | DNS #1 | DNS #2 | Privacy Policy |
|---|---|---|---|---|
| DNS4EU | Europe | 86.54.11.1 | 86.54.11.201 | Privacy Policy |
| Digitalcourage | Germany | 5.9.164.112 | -- | Privacy Policy |
| UncensoredDNS | Denmark | 89.233.43.71 | 91.239.100.100 | Privacy Policy |
| Dismail | Germany | 116.203.32.217 | 159.69.114.157 | Privacy Policy |
| DNS Watch | Germany | 84.200.69.80 | 84.200.70.40 | -- |
| FDN | France | 80.67.169.12 | 80.67.169.40 | -- |
| OpenNIC | Various | Various | Various | Various |
How to block ads? Is Pi-Hole a YouTube ad blocker?
Pi-hole filters web traffic, blocking ads and trackers without the need for extra software. Via Pi-Hole’s web interface, you can add blocklists for further ad and malware filtering. Note however that Pi-hole does not block in-video ads on platforms like YouTube; for this, tools like uBlock Origin are required.
| Block lists | Description |
|---|---|
| Default | • https://raw.githubusercontent.com/StevenBlack/hosts/master/hosts • http://sysctl.org/cameleon/hosts • https://s3.amazonaws.com/lists.disconnect.me/simple_ad.txt |
| PiHole Adlists | • https://raw.githubusercontent.com/StevenBlack/hosts/master/data/UncheckyAds/hosts |
| Malicious sites | • https://raw.githubusercontent.com/StevenBlack/hosts/master/data/add.Risk/hosts |
Tell me more about Pi-hole terminal commands
Most of Pi-hole's configuration can be performed on the web interface. Alternatively, you can also configure Pi-hole directly on the server, via the terminal. Many settings can be changed in the /etc/pihole/pihole.toml file, or using the command line. The full list of commands can be found on Pi-hole's website:
| Command | Description |
|---|---|
| pihole status | Status |
| pihole -t tail log | Real time log |
| pihole -c | Statistics |
| pihole -w -l | List whitelisted domains |
| pihole -w example.com | Add example.com to whitelist |
| pihole -w -d example.com | Remove example.com from whitelist |
| pihole -b -l | List blacklisted domains |
| pihole -b example.com | Add example.com to blacklist |
| pihole -b -d example.com | Remove example.com from blacklist |
| pihole-FTL --config dns.upstreams 'XX.XX.XX.XX' | Change upstream DNS to XX.XX.XX.XX |
| pihole-FTL --config dns.hosts 'XX.XX.XX.XX example.com' | Set custom local DNS records, pointing example.com towards the IP XX.XX.XX.XX |
| pihole-FTL --config dns.listeningMode 'ALL' | Allow Pi-hole to listen on all interfaces. Required to use OpenVPN |
| pihole-FTL --config webserver.port '8080o,8443os,[::]:8080o,[::]:8443os' | Use ports 8080 and 8443. Required when using Pi-hole and Apache on the same machine |
| pihole-FTL --config webserver.tls.cert '/etc/pihole/combined.pem' | Path to the SSL certificate |
| pihole -up | update pihole |
| pihole -l off | query logging off |
| pihole -l on | query logging on |
| pihole enable | enable pihole |
| pihole disable | disable pihole |
| pihole disable 10m | disable pihole for 10 minutes |
| pihole disable 60s | disable pihole for 60 seconds |
| pihole uninstall | uninstall pihole |
Secure access with OpenVPN
At this stage, the server is only accessible from within your home network, since it's shielded from the Internet by a firewall. Enabling remote access typically involves ‘poking’ multiple holes into the firewall, which exposes ports and increases vulnerability.
A Virtual Private Network (VPN) allows for a secure remote access to your server, while minimizing exposure. With a VPN, only one port is made accessible, and connections require pre-authorization via certificate and password.
Step-by-step guide
OpenVPN installation
OpenVPN is open source and uses OpenSSL, TLS and many security features. It can be set up with an easy install script:
wget https://git.io/vpn -O openvpn-install.sh
sudo bash openvpn-install.sh
Follow the on-screen instructions:
| Prompt | Instructions |
|---|---|
| What is the public IPv4 address or hostname? | Enter your public IPv4 address, which you can find for example on whatsmyip.org. For this tutorial, let's assume your public IP address is 88.888.88.88 (adjust accordingly). |
| Which protocol do you want for OpenVPN connections? | Choose the recommended UDP protocol. |
| What port do you want OpenVPN listening to? | Choose a port, for the purpose of this tutorial we'll use the standard port 1194. |
| Which DNS do you want to use with the VPN? | Since we're using Pi-hole as DNS server, select the option Current system resolvers. |
| Finally, tell me your name for the client certificate. | Choose a name for your first VPN client certificate. For the purpose of this tutorial, we'll create a certificate labelled computer_vpn, adjust accordingly. |
Once the installation completes, the terminal should look similar to this:
Welcome to this OpenVPN road warrior installer!

I need to ask you a few questions before starting setup.
You can use the default options and just press enter if you are ok with them.

This server is behind NAT. What is the public IPv4 address or hostname?
Public IPv4 address / hostname [88.888.88.88]: 88.888.88.88

What IPv6 address should the OpenVPN server use?
    1) 1a00:a0a:10a:10a0:a00:00ff:faf0:a011
    2) 1a00:a0a:10a:10a0:a00:00bb:faf0:a022
IPv6 address [1]: 1

Which protocol do you want for OpenVPN connections?
1) UDP (recommended)
2) TCP
Protocol [1]: 1

What port do you want OpenVPN listening to?
Port [1194]: 1194

Which DNS do you want to use with the VPN?
1) Current system resolvers
2) 1.1.1.1
3) Google
4) OpenDNS
5) NTT
6) AdGuard
DNS [1]: 1

Finally, tell me a name for the client certificate.
Client name [client]: computer_vpn

We are ready to set up your OpenVPN server now.

[etc.]

Finished!

The client configuration is available in: /home/gofossadmin/computer_vpn.ovpn
New clients can be added by running this script again.
Certificates
A first VPN client certificate, computer_vpn.ovpn, has been generated during the installation of OpenVPN. Create as many certificates as needed by re-running the install script, one for each device connecting to the server: desktop computers, laptops, tablets, phones, etc.
For the purpose of this tutorial, we'll create a second certificate called phone_vpn.ovpn. Of course, you can choose any name for the certificates. Just make sure to adjust the commands accordingly:
sudo bash openvpn-install.sh
The terminal should display something similar to:
Looks like OpenVPN is already installed.

What do you want to do?
1) Add a new user
2) Revoke an existing user
3) Remove OpenVPN
4) Exit
Select an option: 1

Tell me a name for the client certificate.
Client name: phone_vpn

[...]

Write out database with 1 new entries
Data Base Updated

Client phone_vpn added, configuration is available at: /home/gofossadmin/phone_vpn.ovpn
Finally, set the correct permissions:
cd
sudo chmod 755 *.ovpn
sudo chown gofossadmin:gofossadmin *.ovpn
OpenVPN configuration
Open port 1194 (UDP), or whatever port you specified during the installation of OpenVPN:
sudo ufw allow 1194/udp
Check if the port has been successfully added to the firewall rules:
sudo ufw status numbered
Confirm whether the virtual interface tun0 works, and get the name of the default subnetwork:
ip ad | grep tun0
Get the OpenVPN server's IP address:
ip route | grep tun0
Make sure traffic is routed via the VPN tunnel:
sudo apt install traceroute
traceroute 10.8.0.1
Next, we are going to tell clients which connect to the VPN to use Pi-hole as primary DNS server. Edit the OpenVPN configuration file:
sudo vi /etc/openvpn/server/server.conf
Comment out all existing dhcp-option settings (put a hashtag # at the beginning of the respective line) and replace them with the tun0 interface:
#push "dhcp-option DNS XX.XX.XXX.XXX"
#push "dhcp-option DNS XX.XX.XXX.XXX"
push "dhcp-option DNS 10.8.0.1"
Restart the OpenVPN server:
sudo systemctl restart openvpn-server@server
Finally, allow Pi-hole to listen on all interfaces:
pihole-FTL --config dns.listeningMode 'ALL'
Router settings
Check your router settings and make sure:
- the port used by OpenVPN is forwarded correctly (in this example
1194, adjust accordingly). Refer to the router's manual for more information - the port
53is closed. Scan for open ports using the tools of Gibson Research Corporation: selectProceed ‣ All service portsand make sure port53doesn't appear asopen
Clients
Only devices with valid certificates can establish a VPN connection to securely access self-hosted services. Here is how to transfer the previously generated certificates from the server to the devices.
We assume the client device runs Ubuntu/Linux and can establish a remote SSH login. Open a terminal on the client device, switch to the administrator user (adjust accordingly) and retrieve all certificates from the server:
su - gofossadmin
scp -v -P 2222 gofossadmin@192.168.1.100:/home/gofossadmin/*.ovpn .
Finally, configure the device's network connection:
| Step | Instruction |
|---|---|
| 1 | Click on the Wifi icon in the top bar. |
| 2 | Click on Settings. |
| 3 | Navigate to the Network menu entry. |
| 4 | Click on the + icon in the VPN section. |
| 5 | Select Import from file. |
| 6 | Browse to the certificate (in this example computer_vpn.ovpn) and click on Open. |
| 7 | Click on the Wifi icon in the top bar. |
| 8 | Enable the VPN connection computer_vpn. |
That's it! Your desktop device can securely connect to the server via VPN, from anywhere in the world.
Open F-Droid on your mobile device and install OpenVPN for Android.
Connect the mobile device via USB to the desktop device with which you retrieved all certificates from the server. Copy the certificate from the desktop device to the mobile device (in this example, the certificate is named phone_vpn.ovpn, adjust accordingly).
Finally, open the OpenVPN app on your mobile device and configure it:
| Step | Instruction |
|---|---|
| 1 | Tap on + and then Import. |
| 2 | Browse to the certificate (in this example phone_vpn.ovpn) and import it. |
That's it! Your mobile device can securely connect to the server via VPN, from anywhere in the world.
Test your setup
From now on, each time you enter an address on a VPN-connected device, Pi-hole blocks encountered ads and trackers. If the address points to a self-hosted service, Pi-hole redirects the request to your server. External website requests are redirected to chosen upstream DNS servers. All traffic is encrypted using HTTPS for enhanced security. To ensure your setup functions correctly, follow the steps below.
Step-by-step guide
- Visit ads-blocker.com or cnn.com to verify ad blocking.
- Access
https://mypihole.gofoss.duckdns.org:8443/admin(adjust as needed) to verify correct resolution of local services. - Browse to dnsleaktest.com or bash.ws to check for DNS leaks.
Support
For further details or questions, refer to the documentation of Pi-hole, Let's Encrypt, and OpenVPN. Or ask the communities of Pi-hole, Let's Encrypt or OpenVPN for help.